A presentation folder looks simple when it is finished, but the artwork is more complicated than a standard flyer or brochure. The file has to account for the front and back covers, pockets, folds, trim lines, bleed, safe areas and any business card slots. Getting those details right before printing helps avoid common problems such as text disappearing into a fold, white edges after trimming, upside down pocket artwork or a finished folder that does not hold the documents it was designed for.
This guide explains the most important decisions before ordering presentation folders, including standard folder sizes, how to read a dieline, pocket configurations and how the artwork should be set up. If you already know what you need and are looking for production options, see our Digital and Offset Printing services for presentation folders, brochures, booklets and other business printing in Hamilton and Burlington.
What Is a Presentation Folder?
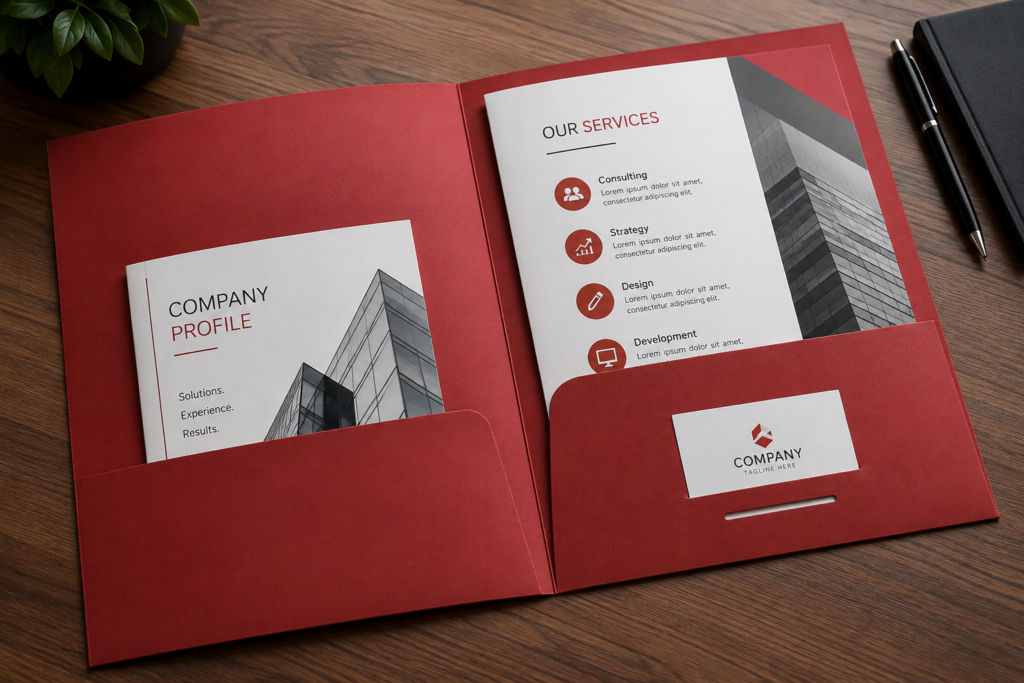
A presentation folder is a printed folder designed to organize and present loose documents in a professional package. Most business presentation folders have one or two inside pockets. Depending on the design, those pockets may also include slits that hold a standard business card.
They are commonly used when handing someone several documents that should stay together, such as:
- proposals and quotations
- sales sheets
- patient information
- real estate listing packages
- mortgage documents
- onboarding paperwork
- course information
- reports
- brochures
- price sheets
- forms
- event materials
For example, instead of giving a prospective client a quotation, product sheet, company brochure and business card as four separate pieces, all four can be organized inside one branded folder.
Presentation Folder vs Pocket Folder
The terms presentation folder and pocket folder are often used interchangeably. A pocket folder simply describes the construction: a folder with one or more pockets.
A presentation folder usually describes the purpose: presenting documents to a customer, patient, student, buyer, prospect or other recipient. In practice, a standard branded 9 × 12 pocket folder is also a presentation folder.
Presentation Folder vs Regular File Folder
A regular office file folder is primarily designed for filing and storage. A presentation folder is designed to be handed to someone.
That changes what matters.
| Feature | Presentation folder | Regular file folder |
|---|---|---|
| Main purpose | Present documents professionally | Store and organize documents |
| Full colour branding | Common | Less common |
| Inside pockets | Usually | Not always |
| Business card slit | Often available | Uncommon |
| Custom artwork | Common | Usually minimal |
| Client facing | Yes | Usually internal |
| Marketing value | High | Low |
If the folder will be part of a sales meeting, proposal, welcome package or customer handoff, presentation folder printing is normally the better format.
Presentation Folder vs Report Cover
A report cover protects a bound or stapled document. A presentation folder holds multiple separate pieces.
For example:
Report cover
A 40 page annual report is bound together and given a printed cover.
Presentation folder
A sales package contains:
- 12 page brochure
- quotation
- product sheet
- case study
- business card
The documents remain separate but are kept together inside the folder.
This distinction is useful when deciding whether you need a folder, booklet or bound document.
Where Presentation Folders Are Commonly Used
Presentation folders work particularly well when an organization regularly hands customers or stakeholders several related documents at the same time.
Healthcare
A healthcare organization might use a folder for:
- patient information
- treatment instructions
- forms
- program brochures
- appointment information
- referral documents
For other printed healthcare materials, see our Healthcare Printing Services.
Real Estate
Real estate agents and brokerages can use presentation folders for:
- buyer packages
- seller presentations
- listing information
- feature sheets
- neighbourhood information
- mortgage documents
- business cards
See our Real Estate Printing services for other listing, brokerage and property marketing materials.
Education and Training
Schools and training organizations can use folders for:
- admissions packages
- orientation information
- course documents
- program brochures
- certificates
- registration forms
- student information
See our Education Printing services for manuals, workbooks, program guides and other educational print materials.
Sales and Professional Services
Folders are also useful for:
- proposals
- quotations
- capability statements
- service sheets
- onboarding packages
- sales presentations
- conference materials
Tip: A presentation folder is most valuable when it solves an organization problem. If you are only inserting one sheet of paper, a folder may be unnecessary. If you regularly hand someone four, five or ten separate pieces, the folder becomes much more useful.
Standard Presentation Folder Sizes
The 9 × 12 inch presentation folder is one of the most common formats because it comfortably holds standard 8.5 × 11 inch letter size documents without forcing them to be folded. Print Factory Ink’s standard presentation folder template produces a finished folder measuring 9 × 12 inches with 4 inch pockets.
That extra space around an 8.5 × 11 sheet is important. A folder exactly 8.5 × 11 inches would leave virtually no clearance around a letter size document. A 9 × 12 folder gives the contents room to sit inside the folder without sticking out along the top or sides.
Common Presentation Folder Formats
| Folder format | Typical documents | Best suited for | Important consideration |
|---|---|---|---|
| 9 × 12 in. | 8.5 × 11 in. letter sheets | Most business folders | Most common general purpose format |
| Custom size | Nonstandard inserts | Specialty projects | Requires a custom dieline and setup |
| Capacity folder | Thicker document packages | Manuals, reports and larger packages | Pocket depth and folder capacity must be confirmed |
| One pocket folder | Smaller packages | Simple proposals or handouts | Less storage but cleaner inside layout |
| Two pocket folder | Multiple documents | Sales kits and presentation packages | Easier to separate different materials |
Why 9 × 12 Works Well With Letter Size Documents
Consider a basic sales package containing:
| Piece | Size |
|---|---|
| Quotation | 8.5 × 11 in. |
| Product sheet | 8.5 × 11 in. |
| Brochure | 8.5 × 11 in. folded |
| Case study | 8.5 × 11 in. |
| Business card | 3.5 × 2 in. |
A standard 9 × 12 presentation folder can organize all of these without requiring the letter size documents to be folded.
That is why this format is widely used for corporate, healthcare, educational and real estate packages.
Closed Size vs Flat Artwork Size
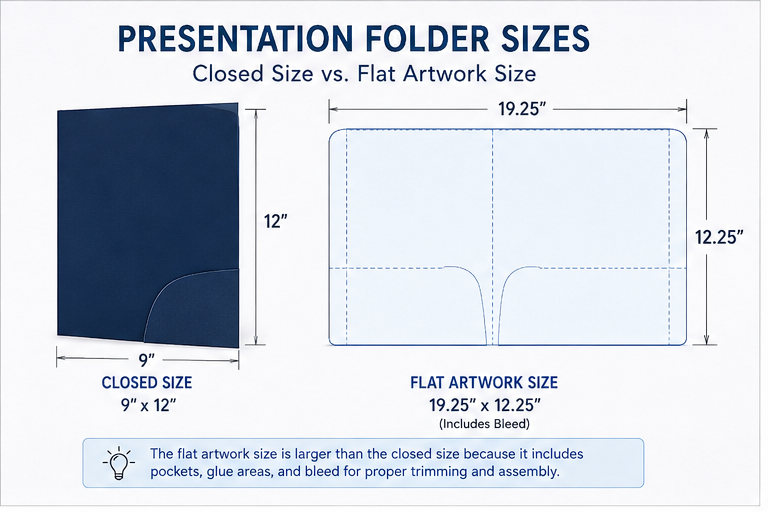
This is one of the most important concepts to understand when designing a presentation folder. 9 × 12 inches describes the finished, closed folder. It does not mean you should create a simple 9 × 12 inch artwork file. Before the folder is assembled, it is printed as a larger flat piece containing the:
- back cover
- front cover
- left pocket
- right pocket
- fold areas
- cut areas
- bleed
- glue or construction areas where applicable
It is then cut, scored, folded and assembled into the final 9 × 12 folder.
Think of it like a cardboard box
A finished box may measure 12 × 10 × 6 inches, but you would never design its packaging artwork on a simple 12 × 10 rectangle. The artwork has to follow the flattened shape of the box. Presentation folders work the same way.
Do Not Calculate the Flat Size Yourself
This is where folder artwork often goes wrong.
It may seem logical to say:
Two 9 inch panels means my artwork should be 18 inches wide.
But a production dieline can also include:
- pockets
- fold allowances
- tabs
- cut shapes
- bleed
- safety margins
- special construction areas
So the correct approach is to start with the printer’s actual dieline rather than building your own rectangle.
Print Factory Ink provides a dedicated 9 × 12 Presentation Folder Template and Guidelines for its standard folder configuration.
When Would You Need a Custom Folder Size?
A custom presentation folder may make sense when the contents are substantially different from standard letter size materials.
Examples include:
- oversized product sheets
- small welcome kits
- unusual certificates
- large technical documents
- sample kits
- specialty sales packages
- custom shaped marketing pieces
Before creating artwork for a custom folder, determine exactly what will go inside.
Example
Suppose a training company wants each folder to contain:
- one 60 page workbook
- three brochures
- six information sheets
- a certificate
- a pen
A standard pocket folder may not be the best solution simply because a 9 × 12 folder technically fits 8.5 × 11 sheets. The thickness of the package also matters. That should be identified before the folder construction and artwork are finalized.
Understanding a Presentation Folder Dieline
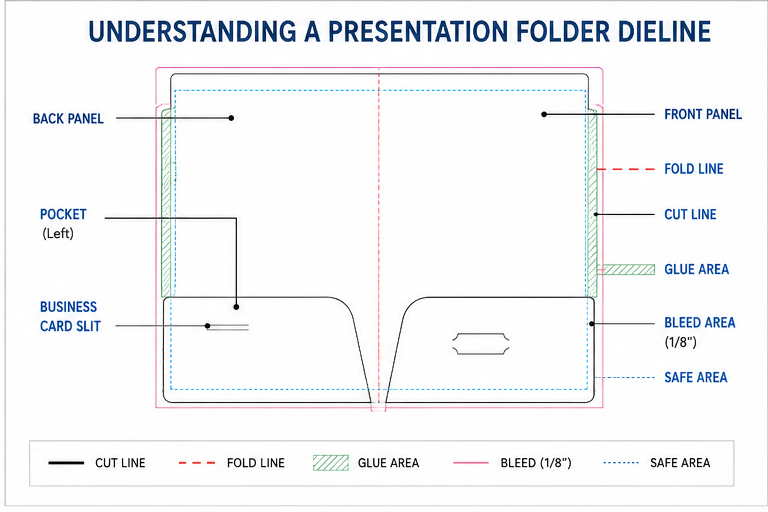
A presentation folder dieline is the production template showing exactly where the printed sheet will be cut, folded and assembled. Think of the dieline as the blueprint for the folder. Your design sits on top of it, but the dieline determines the physical shape of the finished product.
A typical presentation folder dieline identifies:
- front panel
- back panel
- pocket panels
- trim or cut lines
- fold or score lines
- bleed
- safe areas
- business card slits
- construction areas
The Main Parts of a Presentation Folder Dieline
| Dieline element | What it shows | What the designer should do |
|---|---|---|
| Front panel | Finished front cover | Place primary branding here |
| Back panel | Finished rear cover | Add secondary branding or contact details |
| Pocket panels | Inside document pockets | Check orientation carefully |
| Cut line | Where material will be trimmed | Do not place critical content on it |
| Fold or score line | Where folder will fold | Keep important content clear |
| Bleed | Artwork extending beyond trim | Extend backgrounds into this area |
| Safety zone | Area near trim to protect content | Keep text and logos outside it |
| Business card slit | Position of card holder cuts | Keep important design elements clear |
What Do the Solid and Dashed Lines Mean?
On Print Factory Ink’s 9 × 12 presentation folder template:
- the solid dieline indicates where the folder will be cut
- the dotted dieline indicates where the folder will be folded
That distinction matters.
Solid line: cut
Anything outside the final cut area may be removed.
Your background colour or photograph may intentionally continue past this line into the bleed, but important elements should not sit directly against it.
Dotted line: fold
The dotted line indicates where the printed stock will be scored and folded.
A fold does not remove the artwork, but it can visually interrupt it.
Avoid placing small text, telephone numbers, thin logos or other precise details directly across a fold unless the design specifically requires it.
What Is Bleed?
Bleed is extra artwork that extends past the final cut line. Print products cannot simply be trimmed perfectly along the exact edge of a colour block every single time. A small amount of production tolerance has to be allowed for. Without bleed, even a very small movement during trimming could leave a thin white line along the edge. Print Factory Ink’s folder template specifies a 1/8 inch bleed area, and its general file preparation guidelines also call for a minimum 1/8 inch bleed on applicable files.
Adobe similarly identifies 0.125 inch, or approximately 3 mm, as a standard bleed value, while noting that individual print providers may specify different requirements. You can read Adobe’s explanation of how print bleed works in InDesign if you are building the artwork yourself.
Simple bleed example
Suppose the front cover has a dark blue background that is supposed to reach all four edges.
Wrong:
The blue background stops exactly at the cut line.
Correct:
The blue background continues beyond the cut line into the bleed area.
The excess is trimmed away during finishing.
What Is the Safety Zone?
Bleed protects the background from trimming variation. The safety zone protects the important content. Print Factory Ink’s standard presentation folder template identifies a 1/8 inch safety zone around critical areas. Text and important graphics such as logos should remain outside that zone.
Keep these elements safely away from trim and folds
- company names
- logos
- phone numbers
- email addresses
- website addresses
- QR codes
- small text
- borders
- fine graphic details
A background photograph can extend beyond a trim line.
Your phone number should not.
Bleed and Safety Area Are Not the Same Thing
This is a common source of confusion.
| Area | Purpose |
|---|---|
| Bleed | Extends artwork outside the finished piece |
| Trim line | Shows where the folder should be cut |
| Safety area | Keeps important content away from the cut |
| Fold line | Shows where the folder will bend |
A simple way to remember it:
Backgrounds go out
Background colours and photographs extend outward into the bleed.
Important content comes in
Text, logos and important graphics stay inward inside the safe area.
What Should and Should Not Be Printed?
The dieline is primarily a production guide. It is not supposed to become part of the finished visual design. Your customer should not receive a folder with production lines running across it. However, those lines still need to remain available to the prepress team so they know where the folder is cut and folded.
Print Factory Ink’s preflight instructions ask for presentation folder artwork as a flattened spread with dielines on a separate layer. For die cutting, the dieline should be supplied as a stroked vector outline in a designated spot colour. That is why it is important not to randomly delete, move or redraw the production template before submitting the job.
For broader artwork requirements, review Print Factory Ink’s File Preparation Guidelines before exporting the final PDF.
Why You Should Not Alter the Dieline
Moving a fold by even a small amount can affect:
- how the front and back panels line up
- where a pocket begins
- whether a business card slit lands correctly
- how the folder closes
- whether artwork appears centred after assembly
For example, imagine placing a logo exactly 4 inches above the bottom edge because you expect the pocket to end there. If the production fold actually lands somewhere different from your custom template, part of that logo could disappear behind the pocket.
The safest workflow is:
- Download the printer’s dieline.
- Build your artwork around it.
- Leave production lines intact on the appropriate layer.
- Export according to the printer’s instructions.
- Review the final PDF before submission.
Quick Dieline Check Before You Export
Before sending your presentation folder artwork, ask:
- Is the front cover on the correct panel?
- Is the back cover on the correct panel?
- Are pocket graphics facing the correct direction?
- Do backgrounds extend into the bleed?
- Are logos and text inside the safety zone?
- Is anything important sitting on a fold?
- Have I moved any dieline elements?
- Are business card slit locations clear?
- Is the dieline still available on the appropriate layer?
That two minute check can prevent much more expensive changes after the folder goes into production.
Pocket Options and Business Card Slots
Not every presentation folder needs the same interior configuration. Before designing the inside of the folder, decide what it needs to hold. That should determine the pockets, not the other way around.
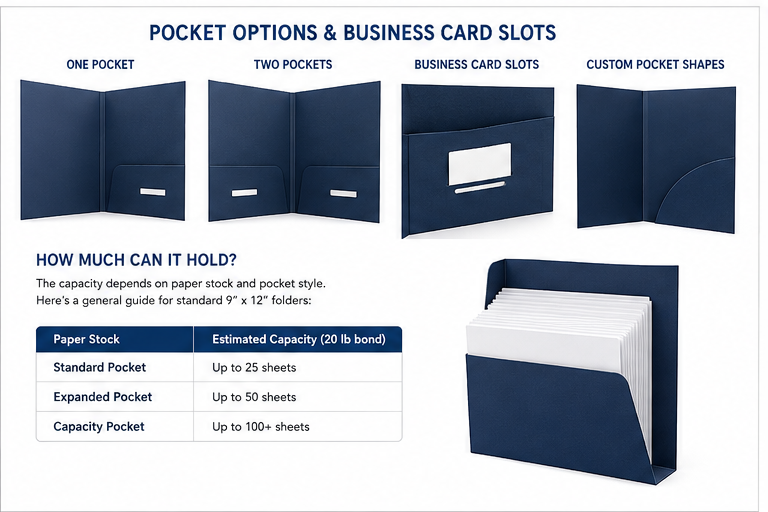
Two Pocket Presentation Folders
A two pocket folder has pockets on both inside panels.
This is the standard choice for many business applications because it allows different documents to be separated.
For example:
Left pocket
- company brochure
- service information
- case study
Right pocket
- quotation
- proposal
- agreement
- next step information
A two pocket layout works particularly well when you want to separate general marketing information from documents specific to that customer.
One Pocket Presentation Folders
A one pocket folder may be enough when the package contains fewer documents. It can also create a cleaner internal design.
For example, a professional services firm might use:
Left inside panel
Printed company message, credentials or service overview.
Right pocket
Proposal, quotation and business card. Instead of automatically choosing two pockets, consider whether the second pocket actually improves the package.
Pocket Height Matters
Print Factory Ink’s standard 9 × 12 template uses 4 inch pockets.
A pocket has to do two things:
- hold the documents securely
- leave enough of the documents visible that they are easy to identify and remove
A pocket that is too shallow may not hold a larger stack securely.
A pocket that is unnecessarily tall may cover too much of the documents.
How Much Material Will the Folder Hold?
This is a question worth answering before printing the folder.
Consider these two packages:
| Package A | Package B |
|---|---|
| 4 letter size sheets | 60 page report |
| 1 brochure | 20 information sheets |
| 1 business card | 3 brochures |
| Light everyday use | Larger document package |
Both technically contain 8.5 × 11 inch documents.
They do not create the same physical load inside a folder.
The second package may need a different pocket or capacity configuration.
Estimate the Actual Package, Not Just the Page Count
Paper thickness varies, so page count alone does not tell you exactly how thick the finished package will be. A practical approach is to assemble a sample.
Example
If the final folder needs to contain:
- 12 page brochure
- 16 page proposal
- 4 product sheets
- 2 forms
- business card
Print or gather representative samples and place the full stack together.
You will immediately get a better sense of whether a standard folder feels comfortable or overloaded.
Tip: If your package changes regularly, design for the typical larger order, not the smallest possible package.
Business Card Slits
Business card slits allow a card to sit visibly inside the folder instead of being dropped loosely into a pocket.
This is useful for:
- sales representatives
- real estate agents
- account managers
- healthcare professionals
- consultants
- mortgage professionals
- recruiters
- service businesses
Print Factory Ink’s standard folder template can be configured with business card slits on one side, both sides or no card slits at all. It can also be configured with one or two pockets.
One Business Card Slot or Two?
For most folders, one business card position is enough. Two positions can make sense when the folder is regularly presented by two contacts.
For example:
Real estate transaction
One slot for the real estate agent and another for the mortgage broker.
Account handoff
One card for the salesperson and another for the account manager.
But do not add a second card slot simply because the template allows it. Empty card slits can look unfinished when they are not being used.
Think About the Card Before Finalizing the Pocket Artwork
The business card becomes part of the visual layout once inserted. If you place important pocket artwork directly behind the card, the card may cover it. Treat the business card position like another design element.
Leave room around it
Avoid putting these immediately behind or around the slot:
- important text
- QR codes
- small logos
- phone numbers
- calls to action
Standard vs Custom Pocket Shapes
Standard straight pockets are usually the simplest option, but custom pocket shapes can be used when the design calls for something different.
Examples could include:
- curved pockets
- angled pockets
- stepped pockets
- specially shaped die cut pockets
Custom shapes can create a more distinctive folder, but they also introduce another production decision.
Use a custom pocket when it supports the design or function of the folder, not simply to make the dieline more complicated.
A Practical Pocket Selection Guide
| What you are putting inside | Configuration to consider |
|---|---|
| A few sales sheets | One or two standard pockets |
| Proposal + marketing material | Two pockets |
| Patient information package | Two pockets for separating forms and information |
| Buyer or seller package | Two pockets + business card slot |
| Course orientation package | Two pockets |
| Thick manual or document set | Confirm capacity before production |
| Simple quotation package | One pocket may be enough |
| Two representatives’ contact cards | Two card positions if they will actually be used |
Example: Building a Real Estate Listing Folder
Suppose an agent wants to hand sellers:
Marketing material
- agent biography
- brokerage brochure
- marketing plan
- recent sales sheet
Property documents
- listing agreement
- pricing analysis
- preparation checklist
A logical folder setup could be:
Left pocket: About the agent
Brochure, biography and marketing plan.
Right pocket: About your property
Pricing analysis, checklist and property specific documents.
Business card slot: Right pocket
Agent’s card.
Now the folder is not simply branded packaging. It creates an obvious information structure for the client.
The same principle works for healthcare, education, sales and professional service packages.
Before Choosing Your Folder Configuration
Answer these five questions:
- What documents will go inside?
- How many pieces are there?
- How thick is the complete stack?
- Do the documents need to be separated into two groups?
- Does a business card need to be displayed?
Once those decisions are made, choosing the pocket configuration becomes much easier.
If you are unsure what configuration fits your project, Print Factory Ink can review the contents, quantity and intended use before production. Our Digital and Offset Printing service covers presentation folders and related business print materials in Hamilton and Burlington.
Paper Stock and Finish Options
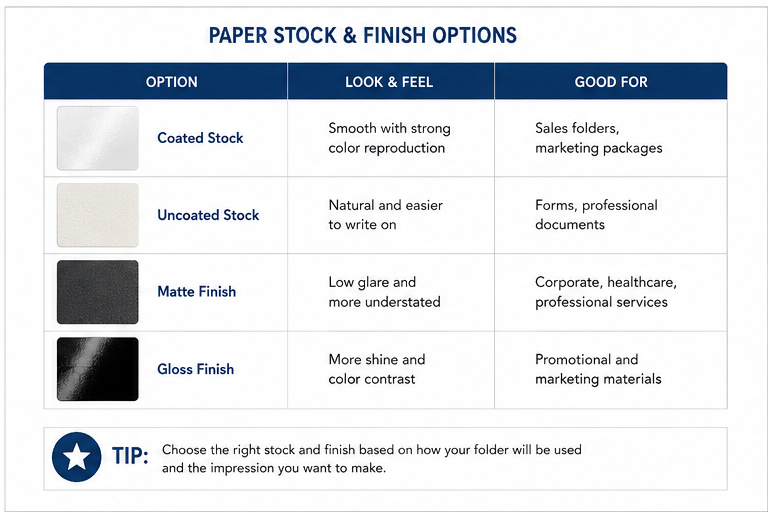
The paper stock and finish affect how the folder feels, how colours reproduce and how well it holds up during repeated handling. You do not necessarily need the heaviest or glossiest option. The right choice depends on how the folder will be used.
| Option | Look and feel | Good for |
|---|---|---|
| Coated stock | Smooth with strong colour reproduction | Sales folders, marketing packages |
| Uncoated stock | Natural and easier to write on | Forms, professional documents |
| Matte finish | Lower glare and more understated | Corporate, healthcare, professional services |
| Gloss finish | More shine and colour contrast | Promotional and marketing materials |
Matte vs Gloss Presentation Folders
A matte finish tends to feel more restrained and professional. It can work well for healthcare organizations, professional services, manufacturers and corporate presentations. A gloss finish gives photographs and colours more visual impact, which can suit real estate, retail and promotional materials. If the folder contains forms or areas that people need to write on, mention that when requesting your quote so the stock and coating can be selected accordingly.
Think About How the Folder Will Be Used
A folder handed out once at an event has different requirements from one used by a sales team every day.
Consider:
- how often it will be handled
- whether people need to write on it
- whether it contains photographs
- whether it needs to match other branded materials
- how many folders you need
If matching an existing brochure, booklet or printed package, send a sample or reference when possible.
How to Prepare Presentation Folder Artwork for Printing
Presentation folders require more setup than a flat flyer because the artwork has to follow the supplied dieline. The safest approach is to start with the printer’s folder template rather than designing the artwork first and trying to fit it into a dieline later.
Presentation Folder File Setup Checklist
Before sending your artwork:
- Use the supplied dieline
- Extend backgrounds into the bleed
- Keep text and logos inside the safe area
- Keep important content away from folds
- Use high resolution images
- Prepare colours appropriately for print
- Embed or outline fonts where required
- Export a print ready PDF
- Keep required dieline information intact
Print Factory Ink’s full Print File Preparation Guidelines explain general requirements for submitting artwork.
If you do not have print ready artwork, our Graphic Design for Print service can also help prepare files for production.
Check Your PDF at 100%
Before submitting the file, open the final PDF and inspect it at full size. Pay particular attention to:
- small text
- logos
- phone numbers
- QR codes
- panel alignment
- pocket orientation
- fold areas
This simple check often catches problems that are easy to miss while working in the design file.
Common Presentation Folder File Mistakes
Most presentation folder problems come from a handful of setup mistakes.
Missing Bleed
If a background stops exactly at the trim line, small trimming variations can leave a white edge. Extend background colours and images into the required bleed area.
Important Text Too Close to the Edge
Keep phone numbers, URLs, logos and other important information comfortably inside the safe area.
Artwork Crossing Fold Lines
Large background graphics can cross folds. Small text and precise design elements generally should not.
Designing the Pockets Upside Down
Pocket panels can look confusing when viewing the folder flat. Always confirm how each section folds before approving the artwork.
Using the Wrong Folder Dimensions
Do not create a generic 9 × 12 rectangle and assume it is the correct production file. Use the actual folder dieline.
Low Resolution Logos or Images
Images that look acceptable on a screen may still appear soft when printed. Use original high resolution artwork whenever possible rather than images copied from websites or screenshots.
Removing the Dieline Too Early
Production needs to understand exactly where the folder is cut and folded. Follow the supplied file instructions rather than deleting or altering the dieline before submission.
Digital vs Offset Printing for Presentation Folders
The best production method depends largely on quantity, artwork and the specifications of the job.
Digital Printing
Digital printing can make sense for:
- smaller quantities
- shorter production runs
- projects that change frequently
- jobs where flexibility is important
Offset Printing
Offset printing is often worth considering for:
- larger quantities
- repeat orders
- longer production runs
- jobs where unit cost becomes increasingly important
There is no universal quantity where one method automatically becomes better. Paper, finishing, colour requirements and quantity all affect the decision. You can use our Digital vs Offset Print Selector for a quick comparison, or learn more about our Digital and Offset Printing services.
Where Presentation Folders Are Commonly Used
Presentation folders work best when several related documents need to be handed to someone as one organized package.
Healthcare
Common uses include patient information, forms, referral materials, program documents and presentation packages. Learn more about Healthcare Printing in Hamilton and Burlington.
Real Estate
Agents and brokerages can use folders for listing presentations, buyer packages, seller information and property documents. See our Real Estate Printing services.
Education
Schools and training organizations can use presentation folders for admissions, orientation packages, course information and program materials. See our Education Printing services.
Businesses and Sales Teams
Folders are commonly used for:
- proposals
- quotations
- sales kits
- onboarding materials
- conference packages
- client presentations
For related brochures, booklets and printed sales materials, visit our Digital and Offset Printing page.
What to Send for a Presentation Folder Quote
You do not need to know every printing specification before asking for a quote. Providing these details is usually enough to get started:
| Information | Example |
|---|---|
| Finished size | 9 × 12 in. |
| Quantity | 500 folders |
| Pockets | Two |
| Business card slit | Right pocket |
| Artwork | Print ready PDF |
| Finish | Matte if available |
| Required date | September 15 |
If You Are Not Sure About the Paper or Finish
That is fine.
Explain what the folder is for and approximately how many you need.
For example:
We need 500 presentation folders for our sales team. Each folder will contain a proposal, brochure, three product sheets and a business card. We want something professional but not overly glossy.
That gives the printer enough context to recommend an appropriate setup.
For presentation folder printing in Hamilton or Burlington, request a quote from Print Factory Ink.
Presentation Folder Printing FAQ
What is the standard size of a presentation folder?
A common finished size is 9 × 12 inches, which is designed to comfortably hold standard 8.5 × 11 inch letter size documents.
What is a presentation folder dieline?
A dieline is the production template showing where the folder will be cut, folded and assembled. Artwork should be designed using the printer’s supplied dieline rather than a simple rectangular page.
How much bleed should presentation folder artwork have?
Print Factory Ink’s standard folder template specifies 1/8 inch bleed. Always follow the specifications provided with the actual dieline being used for your job.
Can presentation folders include business card slots?
Yes. Business card slits can be added to one or both pockets depending on the folder configuration.
What file format should I send for presentation folder printing?
A print ready PDF is generally preferred. Follow the printer’s specific requirements for bleed, colour, fonts and dieline layers. Review our File Preparation Guidelines before submitting artwork.
What is the difference between a pocket folder and a presentation folder?
The terms are often used interchangeably. A pocket folder describes the physical folder with pockets, while presentation folder usually refers to how that folder is used to organize and present business documents.
Ready to Print Your Presentation Folders?
If you know your quantity, folder configuration and required date, send us the details and artwork. If you are not sure which paper, finish or pocket configuration makes sense, tell us what you plan to put inside the folder and we can help determine the right setup.
Request a presentation folder printing quote from Print Factory Ink for printing in Hamilton, Burlington and surrounding areas.